How to clean a shower head without chemicals usually comes down to one thing: breaking up mineral scale and flushing it out, without relying on harsh cleaners that can irritate skin or damage finishes.
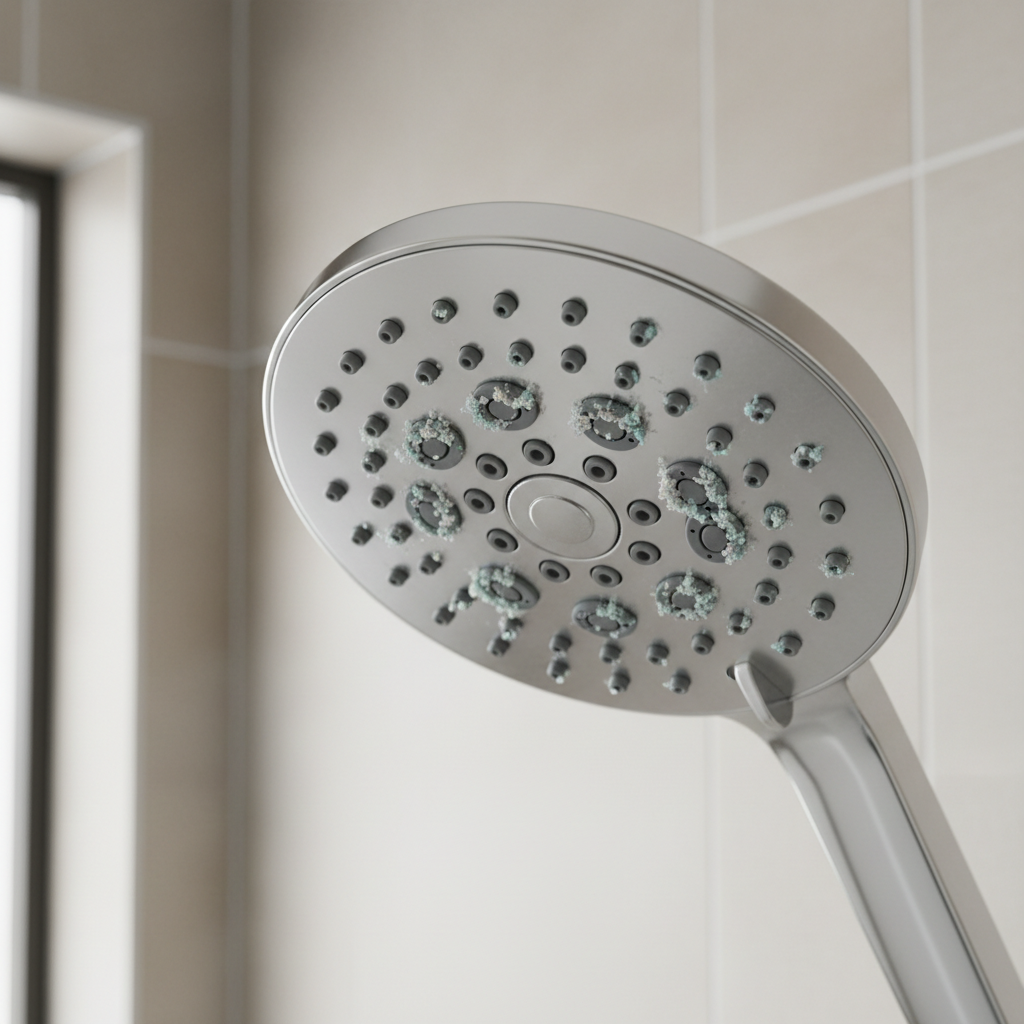
If your spray feels weak, uneven, or starts “shooting sideways,” it’s often not your plumbing, it’s buildup inside the nozzles. Hard water minerals, soap residue, and a little biofilm can narrow openings until the shower feels frustratingly underpowered.
This guide walks you through a few realistic, low-fuss methods using hot water, brushing, and gentle mechanical cleaning, plus a quick way to decide when it’s time to replace parts instead of spending another hour scrubbing.
Why shower heads clog (and why “chemical-free” works)
Most clogs are a mix of hard-water scale and soap scum. Scale is mainly mineral buildup that forms when water evaporates and leaves calcium and magnesium behind, it’s stubborn, but it also responds well to heat, friction, and repeated rinsing.
There’s also the less-fun layer: biofilm. It’s a thin, slippery layer that can develop in damp plumbing surfaces. According to CDC, biofilms can form in wet environments and may protect microbes from being easily rinsed away, which is one reason physical cleaning matters, not just soaking.
Going chemical-free is realistic in many homes because you’re not “dissolving everything instantly,” you’re loosening and removing material step by step, then flushing it out before it re-hardens.
Quick self-check: what kind of clog are you dealing with?
Before you pick a method, do a 60-second check. It saves time, because a deep internal blockage needs a different approach than surface crust.
- Spray is weak across all holes: internal scale or a clogged screen/filter is likely.
- Spray is uneven with a few “jets”: a handful of nozzles are blocked.
- Water pressure is low everywhere in the bathroom: the issue may be upstream, not the shower head.
- White crust around holes: surface scale, often the easiest fix.
- Black or pinkish residue: could be biofilm or mildew; consider more frequent mechanical cleaning and ventilation, and if you have health concerns, it may be worth asking a professional.
Key point: if you can rub the nozzles and see flakes come off, you’re in the “simple cleaning” category.

Method 1: The hot-water flush + brush (fastest, works surprisingly often)
If you want to know how to clean a shower head without chemicals with minimal setup, start here. Heat softens residue, brushing breaks it loose, and flushing pushes it out.
What you need
- Kettle or large cup for hot water (not boiling on plastic parts)
- Old toothbrush or small nylon brush
- Microfiber cloth
- Toothpick or wooden skewer (optional, for individual holes)
Steps
- Run the shower as hot as it goes for 2–3 minutes to warm the head and loosen grime.
- Turn water off, then carefully pour hot water over the face of the shower head, repeating a few times.
- Scrub the nozzles with a toothbrush in small circles. If your head has rubber nubs, pinch and rub them too.
- Pick only what’s stubborn using a toothpick, avoid metal pins that can widen holes or scratch finishes.
- Flush again by running the shower for 1–2 minutes, switching between spray settings if your model has them.
- Wipe dry to slow mineral spotting.
This is the method most people should try first, because it’s low-risk for finishes and doesn’t involve disassembly.
Method 2: Clean the inlet screen/filter (the “hidden” reason pressure drops)
A lot of “my shower pressure died” situations come from the little mesh screen where the shower arm connects to the shower head. It catches debris, and it clogs quietly.
Steps
- Protect the finish: wrap a cloth around the nut, then use an adjustable wrench if hand-loosening fails.
- Unscrew the shower head from the shower arm, keep track of any rubber washer.
- Find the screen: it’s usually a small mesh insert at the inlet.
- Rinse and brush the screen under warm water, scrub gently until it looks clear.
- Flush the shower arm for a few seconds into a bucket (briefly), then reassemble.
If you’re trying to clean a shower head without chemicals and your spray still feels weak after brushing the nozzles, this screen is often the difference maker.
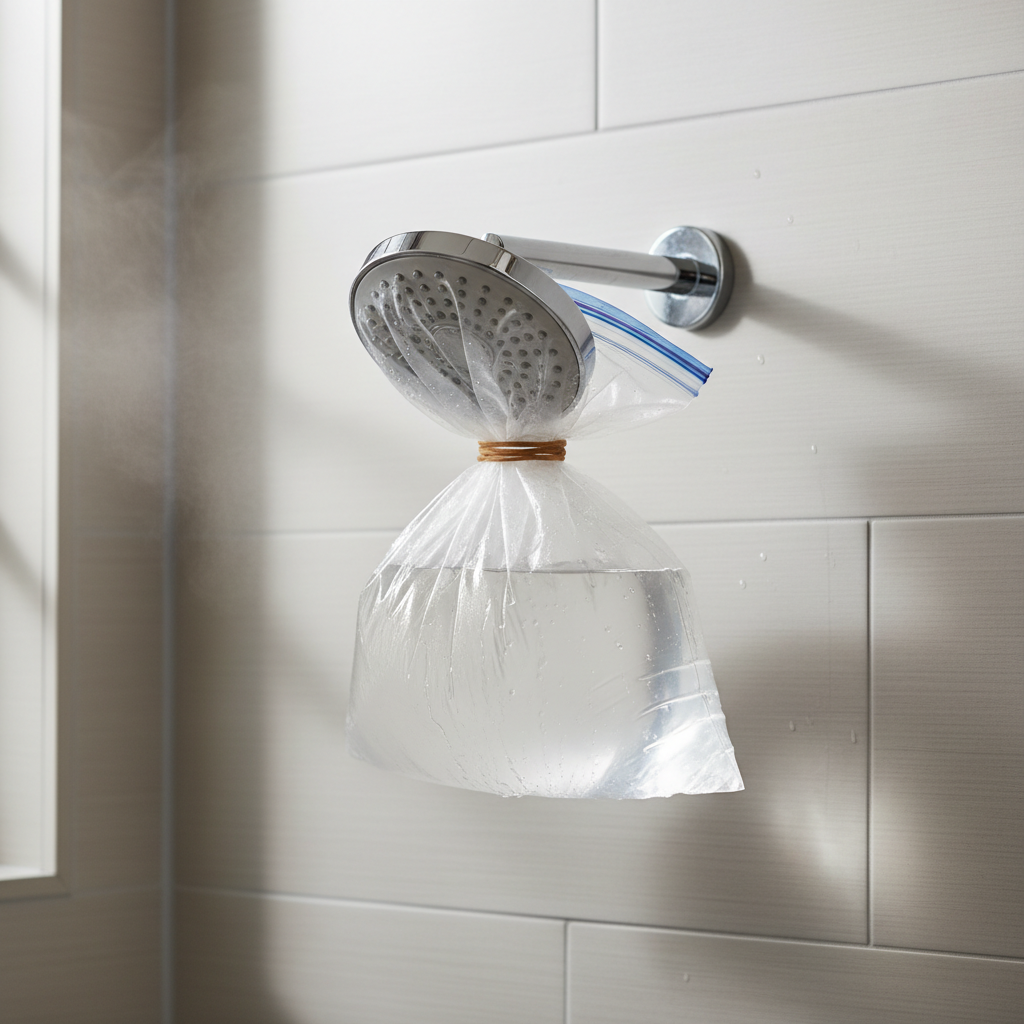
Method 3: Bag-and-soak with plain hot water (for stubborn scale, no additives)
Some deposits need time. Even without vinegar or cleaners, a long hot-water soak can soften scale enough that brushing finally works.
Steps
- Fill a zip-top bag with hot tap water, for metal heads you can go hotter, for plastic keep it safely below boiling.
- Slip the bag over the shower head and secure it with a rubber band.
- Let it sit 30–60 minutes, replace with fresh hot water once if it cools quickly.
- Remove the bag, scrub, then flush the shower for 1–2 minutes.
It’s not as dramatic as acidic soaking, but in many homes it’s enough, especially when combined with cleaning the inlet screen.
Which method to use: a simple comparison table
Pick the approach that matches your symptoms, then escalate only if needed.
| Situation | Best chemical-free approach | Time | Notes |
|---|---|---|---|
| Few clogged jets, visible crust | Hot-water flush + brush | 10–20 min | Gentle, low risk for finishes |
| Overall low spray, sudden pressure drop | Clean inlet screen/filter | 15–30 min | Often the real culprit |
| Heavy scale, brushing barely helps | Hot-water bag soak + scrub | 45–90 min | Works better with a second scrub pass |
| Old head, pitting or cracks | Replace parts or the head | 30–60 min | Cleaning may not restore performance |
Common mistakes (and how to avoid wrecking the finish)
Chemical-free cleaning is usually gentle, but you can still create problems by getting aggressive in the wrong way.
- Using metal picks or drill bits: it can enlarge nozzles, distort spray patterns, and scratch chrome.
- Over-tightening on reassembly: it can crack plastic fittings or strip threads; snug is enough.
- Skipping the washer: a missing or twisted rubber washer leads to leaks, which people misread as a bigger plumbing issue.
- Ignoring the shower arm flush: debris trapped upstream can re-clog the screen fast.
- Assuming every low-pressure issue is scale: some homes have pressure-regulating valves, shared lines, or cartridge issues, and cleaning the head won’t change that.
Also, if you live in a hard-water area, cleaning becomes maintenance, not a one-time project. That’s annoying, but it’s normal.
When to replace the shower head or call for help
If you’ve tried brushing, screen cleaning, and a hot-water soak, but pressure stays poor, it may not be the shower head. It’s also reasonable to stop if the hardware looks worn.
- Replace the head if you see cracks, severe corrosion, or the swivel ball leaks even with a good washer.
- Consider a plumber if multiple fixtures have low pressure, you hear banging, or you suspect a valve or cartridge issue.
- Health concerns: if someone in the home has a compromised immune system and you’re worried about water hygiene, it’s smart to ask a qualified professional what makes sense for your setup.
According to EPA, WaterSense-labeled showerheads can reduce water use while maintaining performance, so if you’re replacing anyway, it’s a reasonable filter for shopping.
Practical routine: keep it clean without making it a “thing”
If you want how to clean a shower head without chemicals to stay easy, the trick is small, regular moves that stop scale from hardening.
- Weekly: rub rubber nozzles with your fingers while the shower runs hot for 20 seconds.
- Monthly: quick toothbrush scrub on the faceplate, then a 60-second flush.
- Every 3–6 months: check and rinse the inlet screen, especially if you’ve had plumbing work.
- After cleaning: wipe the head dry if you can, fewer droplets means fewer mineral spots.
These aren’t perfect, but they keep most shower heads from getting to the “why is this barely a drizzle” stage.
Conclusion: a chemical-free clean is mostly friction + flushing
How to clean a shower head without chemicals isn’t a secret hack, it’s a reliable sequence: warm it up, scrub what you can reach, clear the inlet screen, and flush long enough to push loosened grit out. If that restores spray, great, keep it on a light schedule; if it doesn’t, you’ve learned something useful and replacement or a plumbing check becomes the more sensible next step.
If you want one action today, take the shower head off and look at the inlet screen, it’s the fastest “hidden fix” for a lot of pressure complaints.
Quick takeaways
- Start simple: hot-water flush + toothbrush solves many partial clogs.
- Don’t skip the screen: the inlet filter is a common choke point.
- Soak with hot water when scale is stubborn and you want to avoid cleaners.
- Stop fighting worn hardware: cracks and corrosion usually mean replacement.
FAQ
- Can I really clean a shower head without vinegar or chemicals?
Yes in many cases, especially when the clog is light to moderate. You’re relying on heat, brushing, and flushing, which can remove a lot of mineral scale and residue even if it takes a bit more time. - How often should I clean my shower head if I have hard water?
Many households do better with a small monthly scrub and a screen rinse every few months. If spotting shows up quickly or pressure drops often, you may need to do it a bit more frequently. - Why did my shower pressure drop suddenly overnight?
A sudden change often points to the inlet screen catching debris, sometimes after nearby plumbing work or a water main change. Cleaning the filter is usually a sensible first check. - Is boiling water safe for cleaning?
It depends on the shower head materials. Boiling water can warp some plastics and soften certain seals, so hot tap water is a safer default, and you can go hotter mainly for all-metal heads. - What if some nozzles still won’t unclog?
Try a second round: soak with hot water, then brush again. If a few holes stay blocked, the internal channels may have heavier scale, and replacement can be more practical than endless picking. - Do I need to remove the flow restrictor when cleaning?
Usually no. Removing it can affect compliance and performance, and it won’t solve scale if the real blockage is the screen or nozzles. If you’re unsure what you’re looking at, a quick manufacturer check is safer. - Could the residue on my shower head be mold?
Sometimes it’s soap scum or mineral discoloration, sometimes it may be mildew or biofilm. If you see recurring pink or black film and anyone has sensitivities, it’s reasonable to consult a professional and improve bathroom ventilation.
If you’re trying to keep showers consistent without turning cleaning into a weekend project, a shower head with easy-clean rubber nozzles and an accessible filter screen can make chemical-free maintenance much more realistic, especially in hard-water areas.