How to organize kids toys without bins starts with one shift in mindset, you’re not “storing toys,” you’re designing a cleanup system your child can actually use without you hovering.
If bins drive you nuts, you’re not alone. They overflow, swallow tiny pieces, turn into a dumping ground, and somehow still look messy. Plus, when everything lives in one big container, kids can’t see what they have, so they dump it all out to find one thing.
This guide focuses on alternatives that still keep toys accessible: open shelves, small “homes” for categories, rotation, and a few low-friction rules. You’ll get a quick diagnostic checklist, a simple plan you can implement in a weekend, and a realistic maintenance routine that doesn’t require perfection.
Why toy bins fail in many real homes
Bins aren’t automatically bad, but they tend to break down in predictable ways, especially with preschool and early elementary kids.
- They hide categories. If cars, blocks, and figures share space, cleanup turns into guesswork, and kids dump the bin to search.
- They invite “stuffing.” When the goal becomes closing a lid, you lose the habit of putting items back where they belong.
- They don’t teach sorting. Many kids will sort if the system is obvious, but a deep bin with mixed toys has no visual cues.
- They eat small parts. Pieces disappear, sets break, frustration rises, and suddenly everything feels like clutter.
According to the American Academy of Pediatrics (AAP), a simplified play environment can support deeper play and reduce overwhelm for some kids, which is a polite way of saying “too much stuff makes play messier, not richer.”
Quick self-check: what kind of toy mess are you dealing with?
Before you buy shelves or start rearranging, get clear on the pattern. The fixes differ depending on the mess type.
Pick the statements that feel true
- “Cleanup takes forever because we don’t know where anything goes.” You need clearer toy categories and visible homes.
- “My child plays with five things and ignores the rest.” You likely need toy rotation and fewer items out at once.
- “Small pieces end up everywhere.” You need micro-zones and set protection (trays, shallow drawers, labeled pouches).
- “Toys spread beyond the play area.” You need boundaries and ‘parking spots’ for toys that travel.
- “We’re out of space.” You need vertical storage and stricter curation, not more containers.
If most of your answers point to “unclear homes,” that’s good news, it’s usually fixable without a big purge.
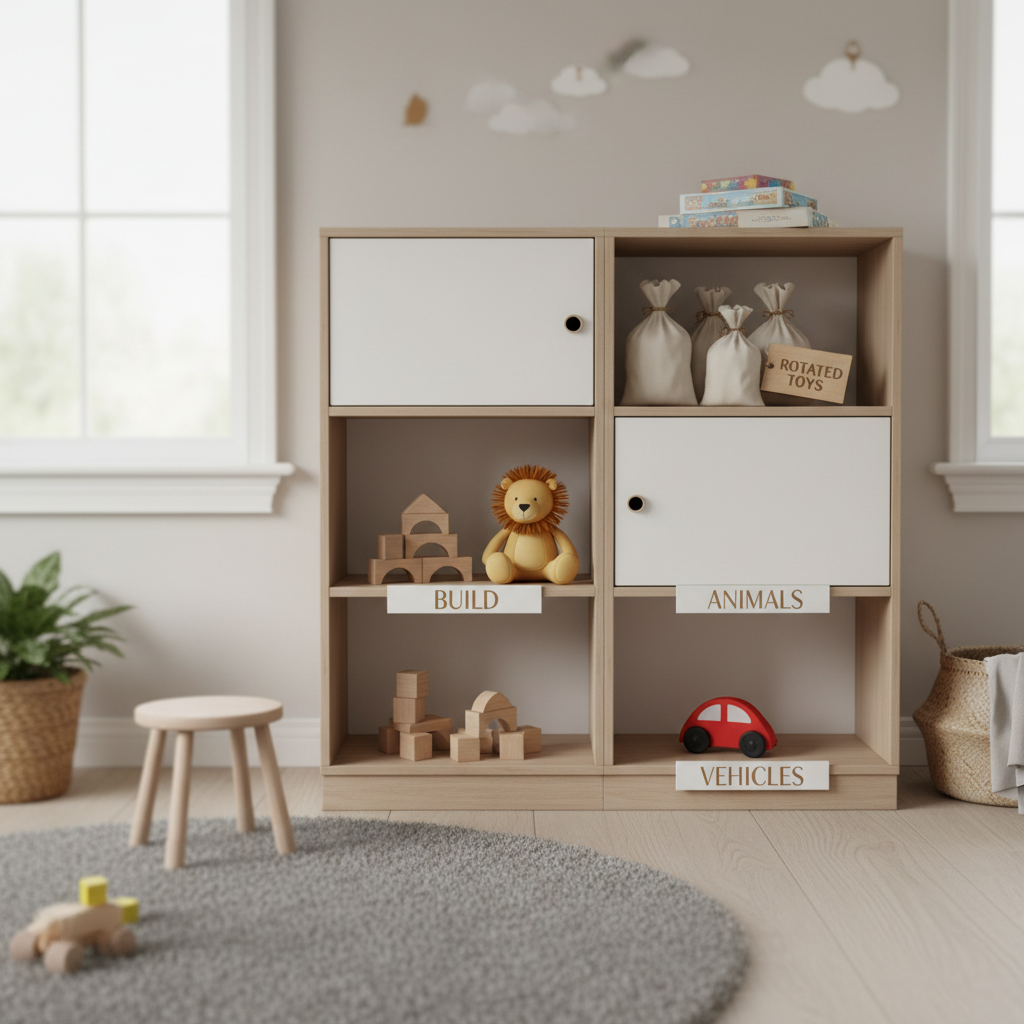
The bin-free framework: zones + surfaces + limits
When people ask how to organize kids toys without bins, they often expect a magic product. In practice, the most reliable approach is a simple framework you repeat across the room.
- Zones: each toy category gets a dedicated area, even if it’s small.
- Surfaces: use shelves, hooks, trays, and shallow drawers so toys stay visible and sortable.
- Limits: each category gets a physical boundary, once it’s full, something rotates out or gets donated.
Think “library,” not “warehouse.” Kids do better when the system looks like the toys, not like storage.
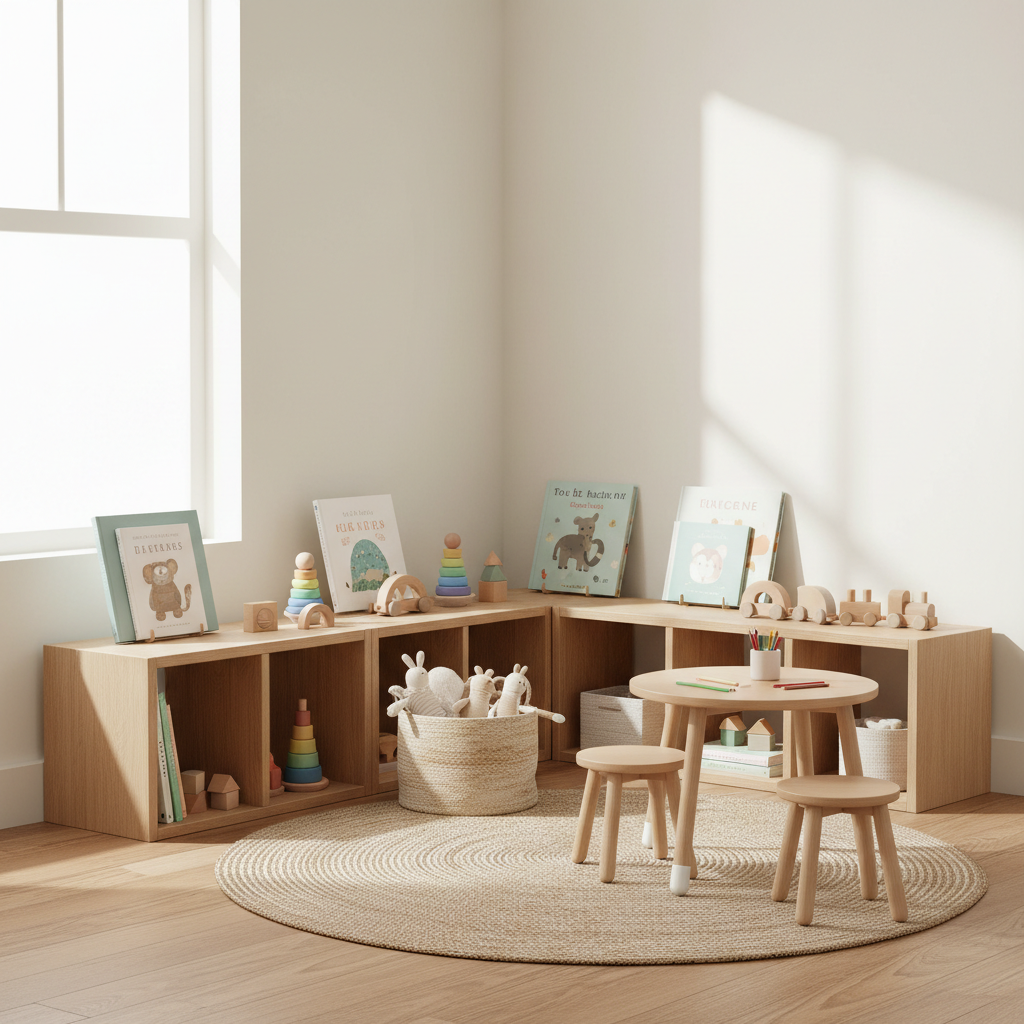
Storage ideas that replace bins (and still look like a home)
You can do this with basic furniture and a few low-cost add-ons. Aim for solutions that are low, open, and specific.
1) Open shelving with clear category homes
- Use a low bookshelf or cube shelf, but skip fabric cubes if your goal is truly bin-free.
- Create one shelf per category (cars, blocks, dolls, pretend food).
- Use bookends or shelf dividers to keep piles from drifting.
Bonus: kids can see the “finished” look, which makes cleanup more achievable.
2) Trays and shallow baskets (not deep bins)
This is the loophole that works for many families: shallow containers that behave like “surfaces,” not black holes.
- Trays for LEGO minifigs, magnetic tiles, train tracks, doll accessories.
- Open-top, shallow baskets for plushies or dress-up items, where perfect sorting isn’t realistic.
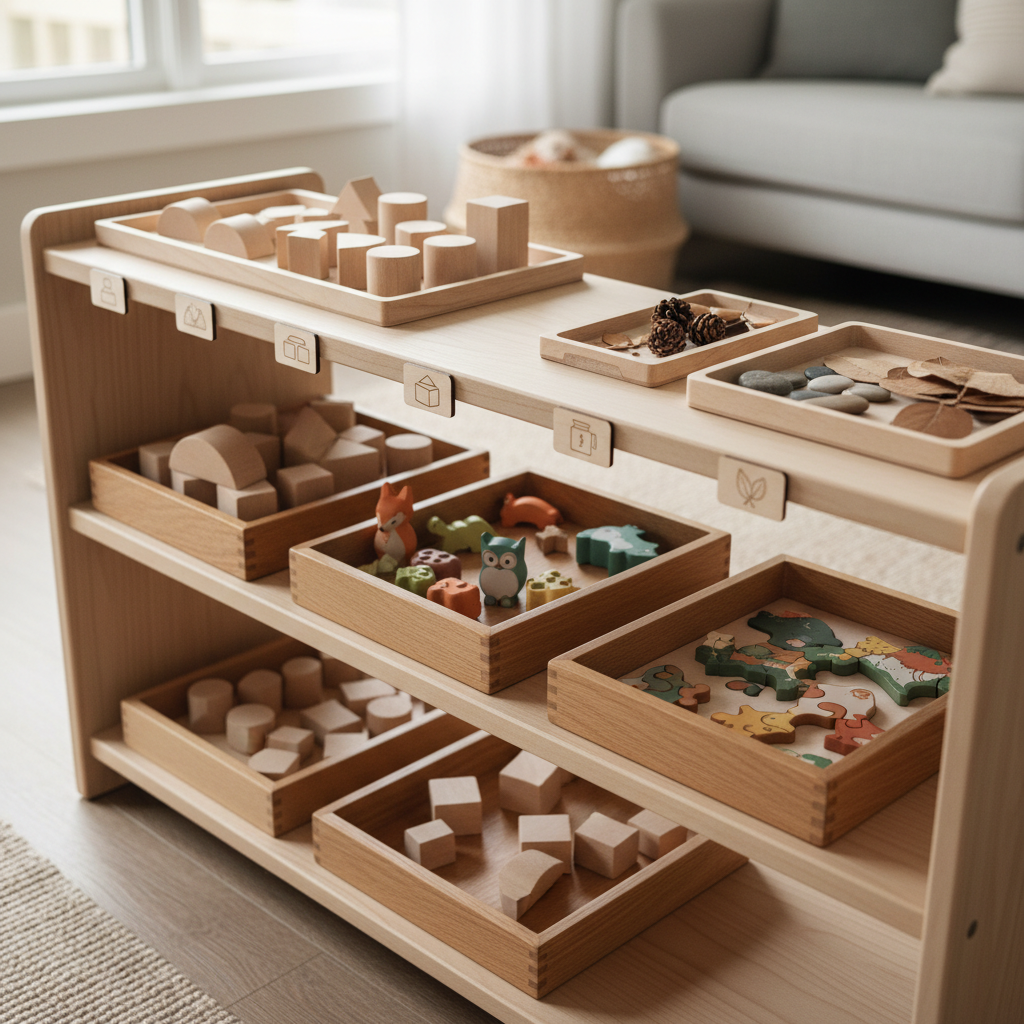
Shallow beats deep because it limits how much you can cram in, and it forces a quick visual reset.
3) Wall storage for “always out” items
- Hooks for costumes, capes, small bags.
- A peg rail for headphones, art smocks, toy tools.
- Book ledges for picture books so covers face out and don’t topple.
If you rent, look for removable hooks that match your wall type and follow the manufacturer instructions so you don’t damage paint.
4) Under-bed and closet “library style” storage
If you need hidden storage, keep it structured. Flat under-bed boxes or closet shelves work well when each one holds one category and is easy to pull out.
- One box for “Duplo only,” one for “extra puzzles,” one for “seasonal pretend play.”
- Keep a simple label so adults can maintain the system.
A practical setup plan you can finish in a weekend
If you try to reorganize everything at once, the room explodes and stays that way. A faster path is to set the “rules of the room” first, then fit toys into them.
Step 1: Define the play boundary
Choose where toys are allowed to live, even if it’s only one corner. A rug often works as a visual border, and kids understand “toys stay on the rug” better than “keep it tidy.”
Step 2: Sort into broad categories (no overthinking)
- Building (blocks, tiles, LEGO)
- Vehicles (cars, trains, tracks)
- Pretend play (kitchen, doctor kit)
- Stuffed animals and dolls
- Arts and crafts
- Games, puzzles, books
Stop at 6–8 categories. Too many labels becomes a whole new problem.
Step 3: Assign each category a “home” that matches how it’s used
- Frequently used sets: open shelf at kid height.
- Small parts: trays or shallow drawers.
- Bulky items: bottom shelf or one wide basket.
- Messy projects: a dedicated craft caddy and a wipeable surface.
Step 4: Set limits with a simple rule
Physical limits are kinder than constant nagging. If the car shelf is full, you don’t need a lecture, you need a choice: rotate some out or donate.
Step 5: Create a “reset routine” that fits your real day
Ten minutes beats an hour. Pick a predictable moment: before dinner, before screen time, or right after school.
- Reset the floor first (big wins fast).
- Return items to category shelves.
- Do a 30-second scan for stray pieces.
What to store where: a simple reference table
Here’s a quick cheat sheet to keep decisions consistent, which matters more than having perfect furniture.
| Toy type | Bin-free storage that works | Why it helps |
|---|---|---|
| LEGO / tiny pieces | Shallow trays, small drawer unit, labeled pouches | Prevents dumping, keeps sets intact |
| Cars, figures | Open shelf with dividers, toy parking strip | Visual “home” makes cleanup obvious |
| Books | Front-facing ledges, low bookcase | Kids choose faster, fewer piles |
| Puzzles, board games | Vertical shelf storage, magazine holders | Easy to pull one item without collapsing stacks |
| Dress-up | Wall hooks, kid closet rod, single wide basket | Reduces “costume avalanche” |
| Stuffed animals | Hammock net, open basket, designated chair | Contains volume without precise sorting |
Safety and sanity: common mistakes to avoid
Some organizing ideas look great online and fall apart in a week. These are the usual culprits.
- Too many categories. If kids need to choose between “animals,” “farm animals,” and “zoo animals,” they’ll quit.
- Adult-height storage. If a child can’t reach it, you become the storage system.
- Open shelves overloaded. Visual clutter still feels like clutter, even if it’s “organized.” Leave breathing room.
- Ignoring choking hazards. Small parts should stay out of reach of younger siblings. According to the U.S. Consumer Product Safety Commission (CPSC), small objects can pose a choking risk for young children, so if ages vary at home, consider a high shelf or secured drawer for tiny pieces and ask a pediatrician if you’re unsure.
- Buying organizers before editing. If you’re drowning in toys, no organizer fixes “too much.” A gentle rotation plan often does.
Keeping it organized long-term (without becoming the toy police)
The goal isn’t a showroom. It’s a home where play can happen and cleanup doesn’t ruin the mood.
Use the “one-minute rescue” on busy days
- Kick everything back into the play boundary.
- Put away just the largest category (often blocks or costumes).
- Stack books back on the ledge.
That’s enough to prevent the slow creep of chaos.
Rotate instead of purging when emotions run high
When kids resist donating, rotation keeps peace. Put half the toys away for 2–4 weeks, then swap. Many families notice kids play more deeply with fewer options.
Teach cleanup as “closing the play”
Language matters. “Close the play” signals a simple finish line. You can even tie it to something positive, like reading time, instead of using cleanup as punishment.
Key takeaways (so you don’t overcomplicate this)
- Visibility beats volume. Open shelves, trays, and hooks make homes obvious.
- Limits beat lectures. Let the shelf size set the boundary for each category.
- Rotation beats more storage. Fewer toys out often means calmer play and faster resets.
- Kid access is non-negotiable. If they can’t reach it, they can’t maintain it.
Conclusion: a calmer room without the bin pile
If you’ve been stuck on how to organize kids toys without bins, the most realistic answer is not a single hack, it’s a small system: clear zones, visible storage surfaces, and limits that your home can hold without daily battles.
Pick one area this week, even one shelf, assign two categories, and set a ten-minute reset routine. Once that corner works, the rest of the room gets easier, almost automatically.
If you want the simplest next step, start with a quick toy rotation and one low shelf for the “daily drivers,” then adjust after you watch how your child actually plays.