how to organize gift bags and tissue paper comes down to two things: stopping the “paper avalanche,” and making sure you can actually find the right size bag fast when you need it.
Most people don’t have “too much” gift wrap, they have a storage system that treats bags, tissue, ribbons, and tags like one messy pile. Then tissue gets bent, bags crease, and you rebuy what you already own.
This guide gives you a practical setup you can fit into a closet, pantry, or under-bed space, plus a quick routine so it stays organized after birthdays and holidays.
Why gift bags and tissue paper get messy so fast
The “why” matters because it tells you what kind of storage will actually hold up. In real homes, clutter builds for predictable reasons.
- Odd shapes fight each other: gift bags want to stand, tissue wants to lie flat, bows want to tangle.
- Overflow behavior: when the container is too small, you start stuffing, and tissue paper crumples first.
- No quick visual cue: if sizes and occasions are mixed, you dig, then everything falls into a heap.
- Seasonal surges: after December or a big party weekend, you’re tired and you “temporarily” toss things in.
Once you design around these friction points, keeping it tidy starts to feel less like a constant chore.
A quick self-check: what storage style fits your space?
Before you buy bins, decide where this category lives and how you actually grab items. Use this as a fast diagnostic.
- If you wrap gifts in one spot (dining table, office desk): keep supplies together in a portable tote.
- If you wrap wherever there’s space: prioritize clear, lidded containers that stack and travel.
- If your closet is tight: go vertical with tall bins or an over-the-door organizer for small items.
- If you buy in bulk: you need a “backstock” zone so daily-use stays easy to access.
According to the National Association of Productivity & Organizing Professionals (NAPO), categories work best when items are grouped by how you use them, not by where you bought them. That’s exactly the mindset that prevents the wrap pile from returning.
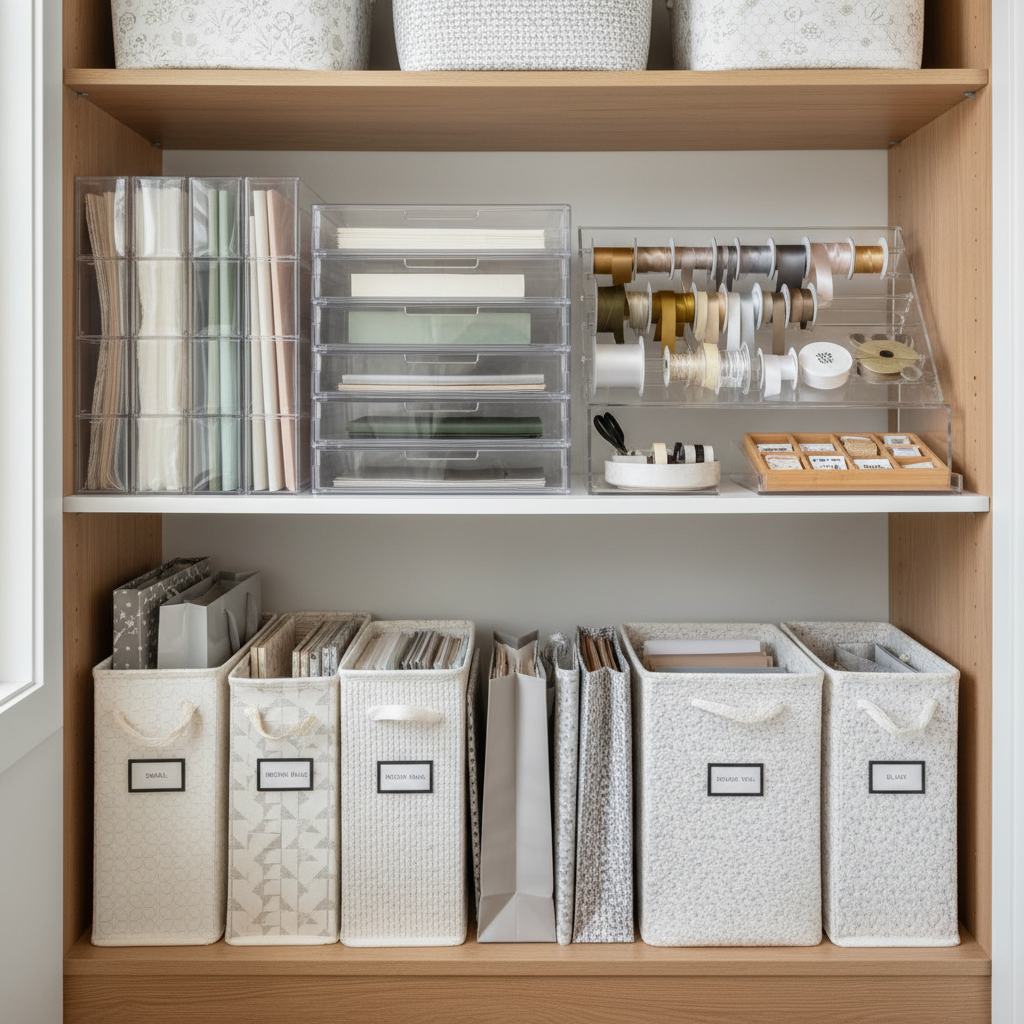
Set up your zones: bags, tissue, and accessories (the simplest system)
This is the core structure. You’re not aiming for perfection, you’re aiming for a setup that still works when you’re in a hurry.
Zone 1: Gift bags (sorted by size, not occasion)
Occasion sorting sounds nice, but most households end up with “birthday” bags that still fit any celebration. Size sorting makes retrieval fast.
- Small: jewelry, candles, small toys
- Medium: books, games, boxed gifts
- Large/Tall: bottles, large boxes, bigger items
- Extra-large: keep a few, store separately to save space
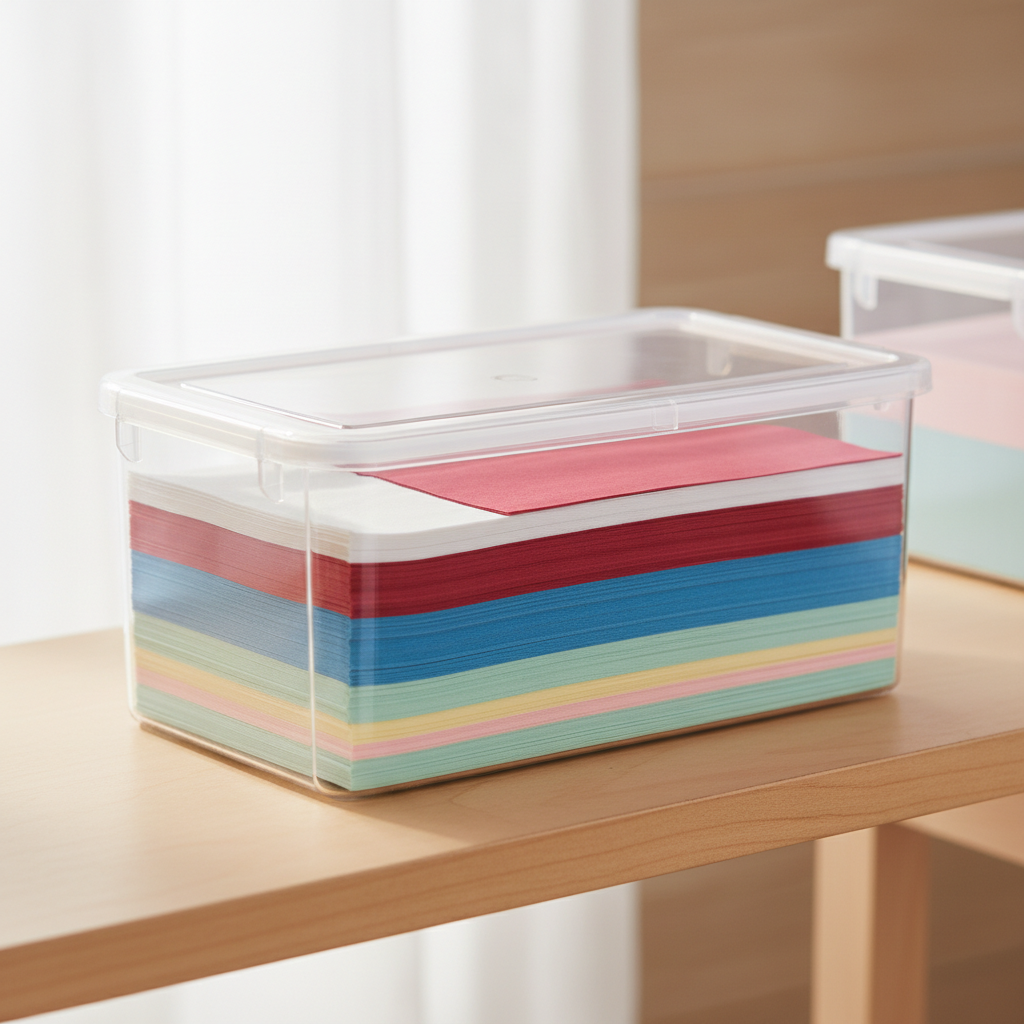
Zone 2: Tissue paper (kept flat and protected)
Tissue paper storage fails when you treat it like wrapping paper. The goal is “flat, dry, reachable.” If your area gets humid, consider a lidded bin to reduce moisture exposure.
- Store full sheets flat in a shallow container or desktop file box.
- Keep one “open pack” on top for daily use, backstock underneath.
- Separate solids from patterns/seasonal if you have a lot.
Zone 3: Accessories (small items need boundaries)
Ribbons, tags, tape, and gift toppers are what make the whole area feel messy. Give them small, hard limits.
- One small bin for bows and toppers
- One pouch or divided box for tags, pens, scissors
- One container for tape and adhesives
Storage options by location (closet, pantry, under bed, garage)
how to organize gift bags and tissue paper looks different depending on where you store them. Pick the option that matches your space, not the one that looks best online.
| Location | What works well | Watch-outs |
|---|---|---|
| Coat/linen closet | Tall open bin for bags, shallow lidded bin for tissue | Don’t block daily items, keep labels visible |
| Pantry/utility shelf | Clear stackable bins, magazine files for small bags | Keep away from spills, food crumbs, heavy traffic |
| Under bed | Low under-bed box for tissue and flat supplies | Dust buildup, check height clearance first |
| Garage/basement | Lidded totes, moisture-resistant bins, labels on two sides | Humidity and pests can damage paper goods |
If you store paper items in a garage or basement, moisture control matters. If you regularly see dampness or musty smells, it may be worth asking a home professional about ventilation or dehumidification, because paper products can warp or develop odor in those conditions.
Step-by-step: a tidy setup you can finish in an hour
You can do a full reset without turning it into a weekend project. The key is to make decisions quickly and avoid over-sorting.
- Step 1: Empty the area and make three piles: bags, tissue, accessories.
- Step 2: Remove “maybe” items: ripped bags, stained tissue, tangled ribbon balls you never use.
- Step 3: Sort bags by size and stand them upright in a tall bin or box.
- Step 4: Flatten tissue, stack by color group, place in a shallow lidded bin.
- Step 5: Put accessories into small containers, then place those containers inside one larger “wrap kit” bin.
- Step 6: Label simply: “BAGS S/M/L,” “TISSUE,” “TAGS + TAPE.” No fancy taxonomy.
Key point: if you can’t reset the space in 3 minutes after wrapping, it’s too complicated.
Common mistakes that keep the mess coming back
A few patterns show up again and again when people try organizing paper goods.
- Storing tissue vertically: it slides, bends, and turns into confetti fast.
- Over-optimizing categories: “kids birthday / adult birthday / host gift / thank you” sounds logical, then nobody follows it.
- Using one giant tote for everything: you end up digging, which means you stop putting things back.
- No limit on volume: if the bin is always overflowing, you’ll always be stuffing.
One more that’s sneaky: keeping too many oversized bags. They’re useful, but a small number goes a long way, and they consume space disproportionally.
Make it stick: a simple maintenance routine
The best system is the one you’ll keep using when you’re tired. Try this light routine.
- After each gift: put leftover tissue back flat, not folded into a ball “for later.”
- Monthly (5 minutes): re-stand bags, remove anything crushed, check if you’re over the limit.
- After peak seasons: move unopened packs to backstock, keep one open pack accessible.
If multiple people wrap gifts in your household, labels matter more than aesthetics. Put labels at eye level, and keep the “wrap kit” easy to grab.
Conclusion: a calmer closet and faster gift prep
When you focus on flat tissue storage, upright bag sorting, and small-item boundaries, the whole category gets easier to live with. You don’t need a Pinterest wall, just a few clear zones and a realistic reset habit.
If you want a quick win today, pick one container for bags by size and one shallow bin for tissue, then label both. That alone usually cuts the chaos dramatically, and makes last-minute gifting much less annoying.
FAQ
How do I store gift bags so they don’t fall over?
Stand them upright in a tall bin or sturdy box, and sort by size so the taller bags support each other. If the bin is too wide, add a divider (even a small box) to keep the row tight.
What’s the best way to keep tissue paper from wrinkling?
Keep sheets flat in a shallow container with a lid. If you must fold, fold once or twice consistently and place heavier colors underneath to reduce shifting.
How many gift bags should I keep?
It depends on how often you gift, but a good rule is “only what fits your bag bin without bending.” If you’re stuffing them in, you’re keeping too many for your space.
Should I organize gift bags by holiday or by size?
Most households do better with size first, because it speeds up choosing the right bag. If you have a lot of seasonal bags, keep a small holiday subset in a separate folder or bin.
How do I organize gift wrap supplies in a small apartment?
Go for a compact “wrap kit” tote with a shallow tissue container and a slim bag bin, then store under a bed or on a closet shelf. The key is stackable, lidded pieces that don’t spill when moved.
Is it okay to store tissue paper in the garage?
Sometimes, but humidity and pests are the usual problems. Use a sealed tote and keep it off the floor; if your garage often feels damp, storing paper goods indoors is typically safer.
How to organize gift bags and tissue paper if I reuse everything?
Build in a “to be reused” tray: one spot where gently used tissue and bags go immediately, then once a month you decide what’s still worth keeping. This prevents the reuse pile from taking over.
What containers work best for ribbons and tags?
Small divided boxes or pouches work well because they prevent tangles and keep tiny pieces visible. The bigger win is giving accessories a strict container limit.
If you’re already close to organized but keep losing time right before a party, it may help to set up a single grab-and-go wrap kit and a labeled tissue bin, so everything you need is in one trip instead of five.